Working with the API
Linken Sphere provides a powerful RESTful API for full automation of actions both within the application itself and in running sessions.
invisible text for space
With the API, you can programmatically control virtually all aspects of the application:
Session management: creation (including bulk creation), cloning, modification, and deletion.
Environment management: working with presets and desktops.
Working with data: importing and exporting cookies in various formats (JSON, Netscape).
Integration with automation frameworks: launching sessions compatible with Playwright, Puppeteer, Selenium, and other tools via Chrome DevTools Protocol (CDP).
Other operations: launching profile warm-ups (WarmUp), assigning and checking proxy connections, and much more.
invisible text for space
You can find a complete list of methods with detailed descriptions and examples in our Postman documentation.
The API is available to Pro and Premium users.
We do not impose artificial limits on the number of requests (RPM/RPH). The speed of the API is limited only by the computing power of your computer.
API activation
By default, the API server is disabled. To start working, you need to activate it and specify the port:
Click on the gear icon in the upper left corner to go to global settings.
Go to the Network section.
In the Api port field, specify the desired port (for example, 36555) and press Enter.

After saving the settings, the API will be available at the local address. For example, if you specified port 36555, the endpoint will be: http://127.0.0.1:36555/
Using presets when working with the API
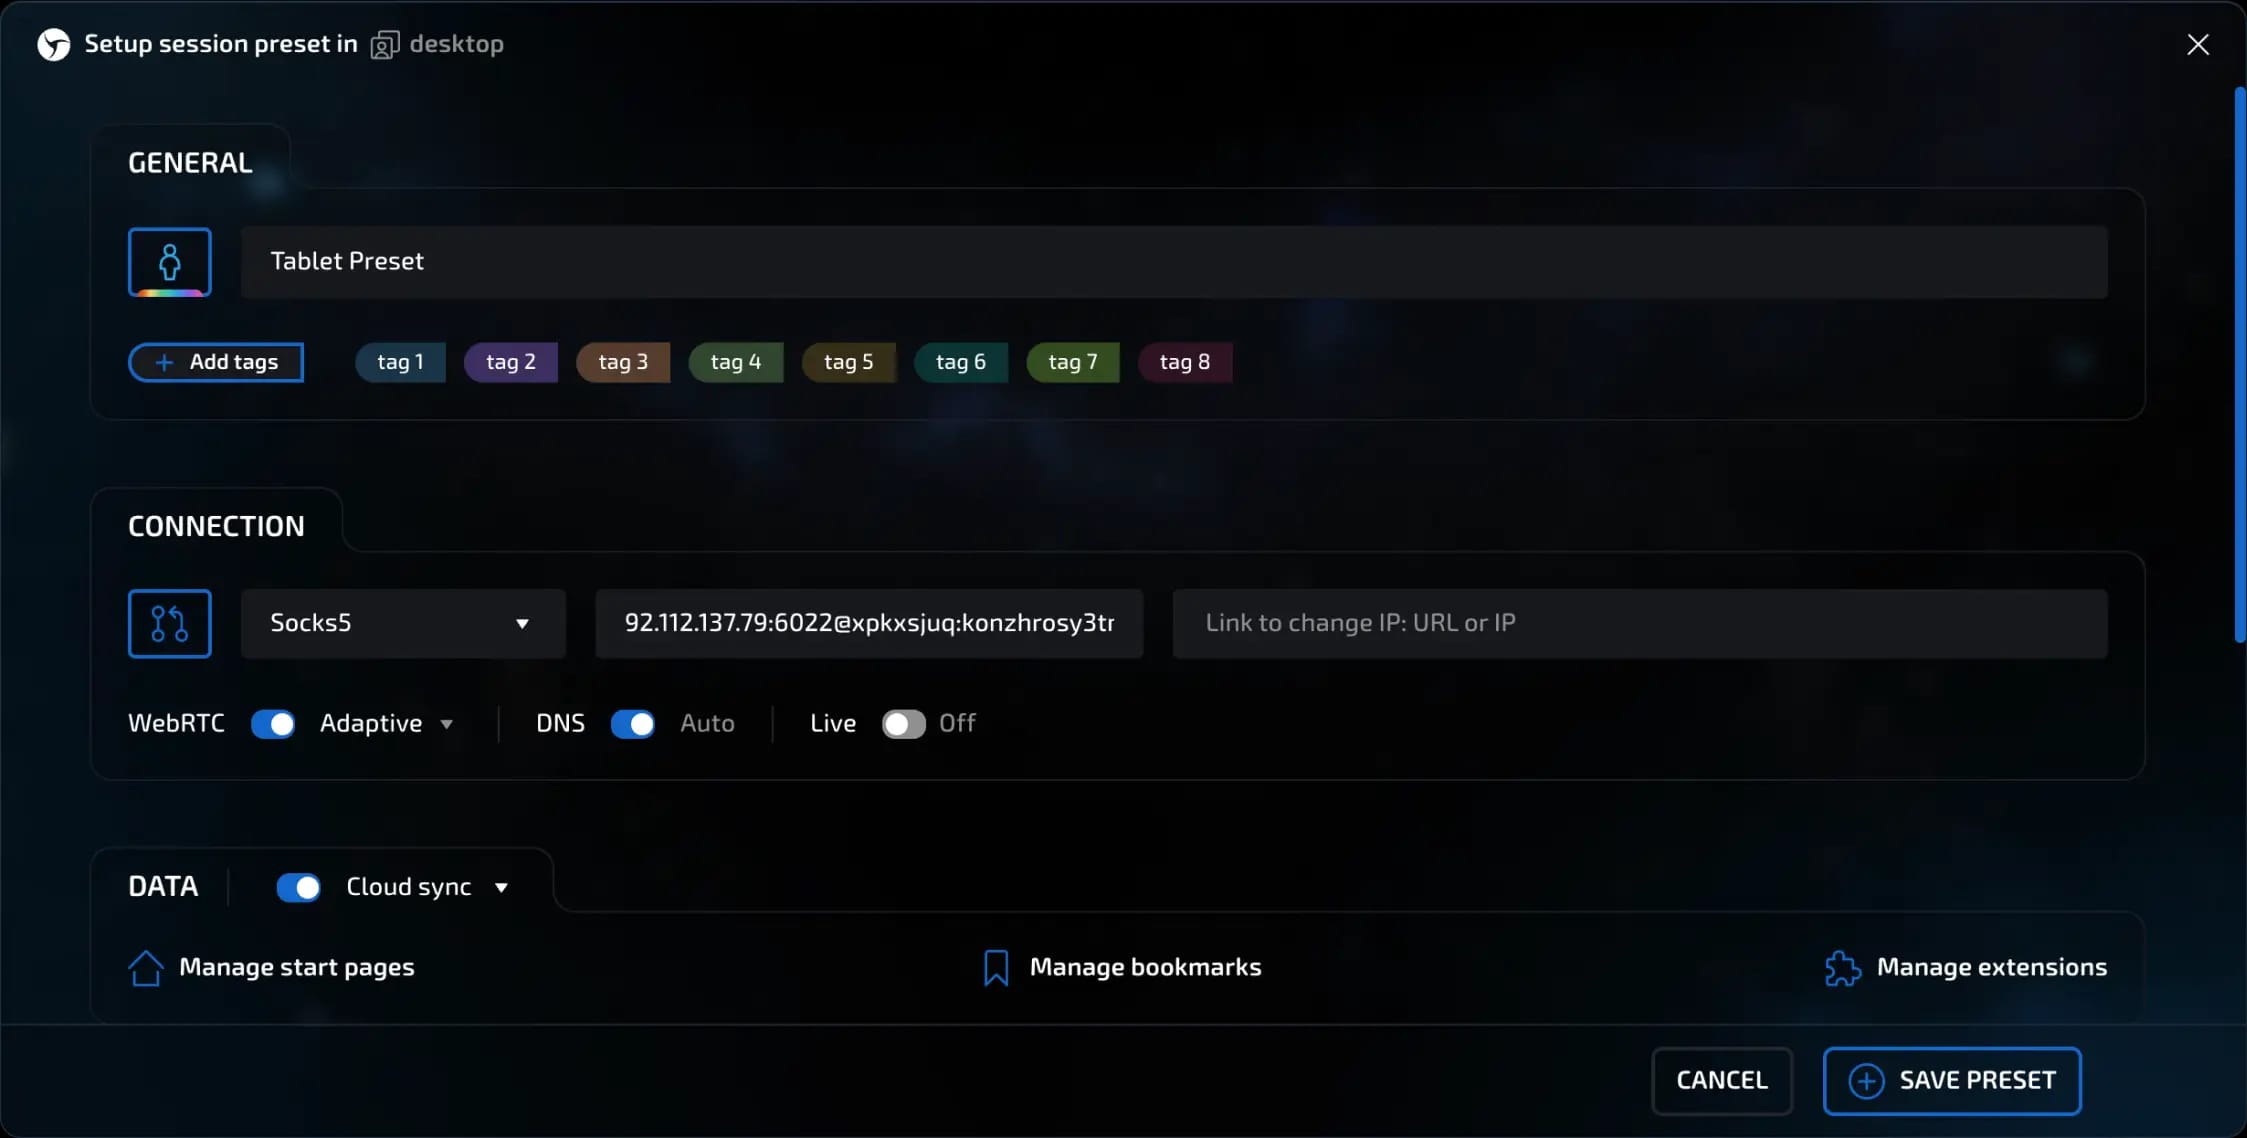
Linken Sphere implements a special approach to creating sessions via the API, aimed at increasing the convenience and efficiency of your work. Instead of passing a full set of parameters in each request, you use presets.
invisible text for space
A preset is a preconfigured template of settings for sessions that you create and configure in the program's graphical interface. You can create multiple presets for different tasks, specifying all the key parameters in them:
Basic configuration data: operating system, browser, etc.
Data storage type: local or cloud.
Custom settings: start pages, bookmarks, and pre-installed extensions.
Supporting functions: for example, AdCrusher activation.
invisible text for space
All other parameters necessary to ensure the uniqueness of the fingerprint are generated automatically based on the settings you select in the preset.
A separate method is used to manage presets via the API: Set Active Provider. With this method, you specify which of the created presets should be active at the moment.
After that, all sessions that you create via the API will automatically use the settings from this active preset.
invisible text for space
This approach offers several key advantages:
You don't need to implement complex fingerprint randomization logic yourself19bb5764-98a3-4ee1-bff8-5306e434493d. Linken Sphere takes care of this task, ensuring high quality and uniqueness of configurations.
Configuration management is simplified. Instead of dozens of parameters in each API request, you only need to specify the ID of the desired preset.
Flexibility and speed. You can quickly switch between completely different configurations (for example, “Windows/Chrome” and “macOS/Safari”) by simply changing the active preset with a single command.
invisible text for space
For more information on how to create and configure templates, see the section — Creating presets.
Basic automation and connection examples
Basic automation consists of the following steps:
Start a session using the API
Connect to the session port using an automation tool
Run your own automation script through an open connection
invisible text for space
To work with the API, the Linken Sphere client must be running and authorized
Step 1. Creating and starting a session using the API
To create a session via the API, you need to send a POST request to http://127.0.0.1:40080/sessions/create_quick

After that, a session will be created using the settings of the active preset on the current desktop. In response, we will receive the name of the created session and its unique “uuid” - this is what future script work is based on.
invisible text for space
{
 "name": "Default provider 4",
 "uuid": "19bb5764-98a3-4ee1-bff8-5306e434493d"
}
invisible text for space
After receiving the “uuid” of the session we need, we can launch it by sending a POST request to http://127.0.0.1:40080/sessions/start and passing the body
invisible text for space
{
 "uuid": "19bb5764-98a3-4ee1-bff8-5306e434493d",
 "headless": false,
 "debug_port": 12345
}
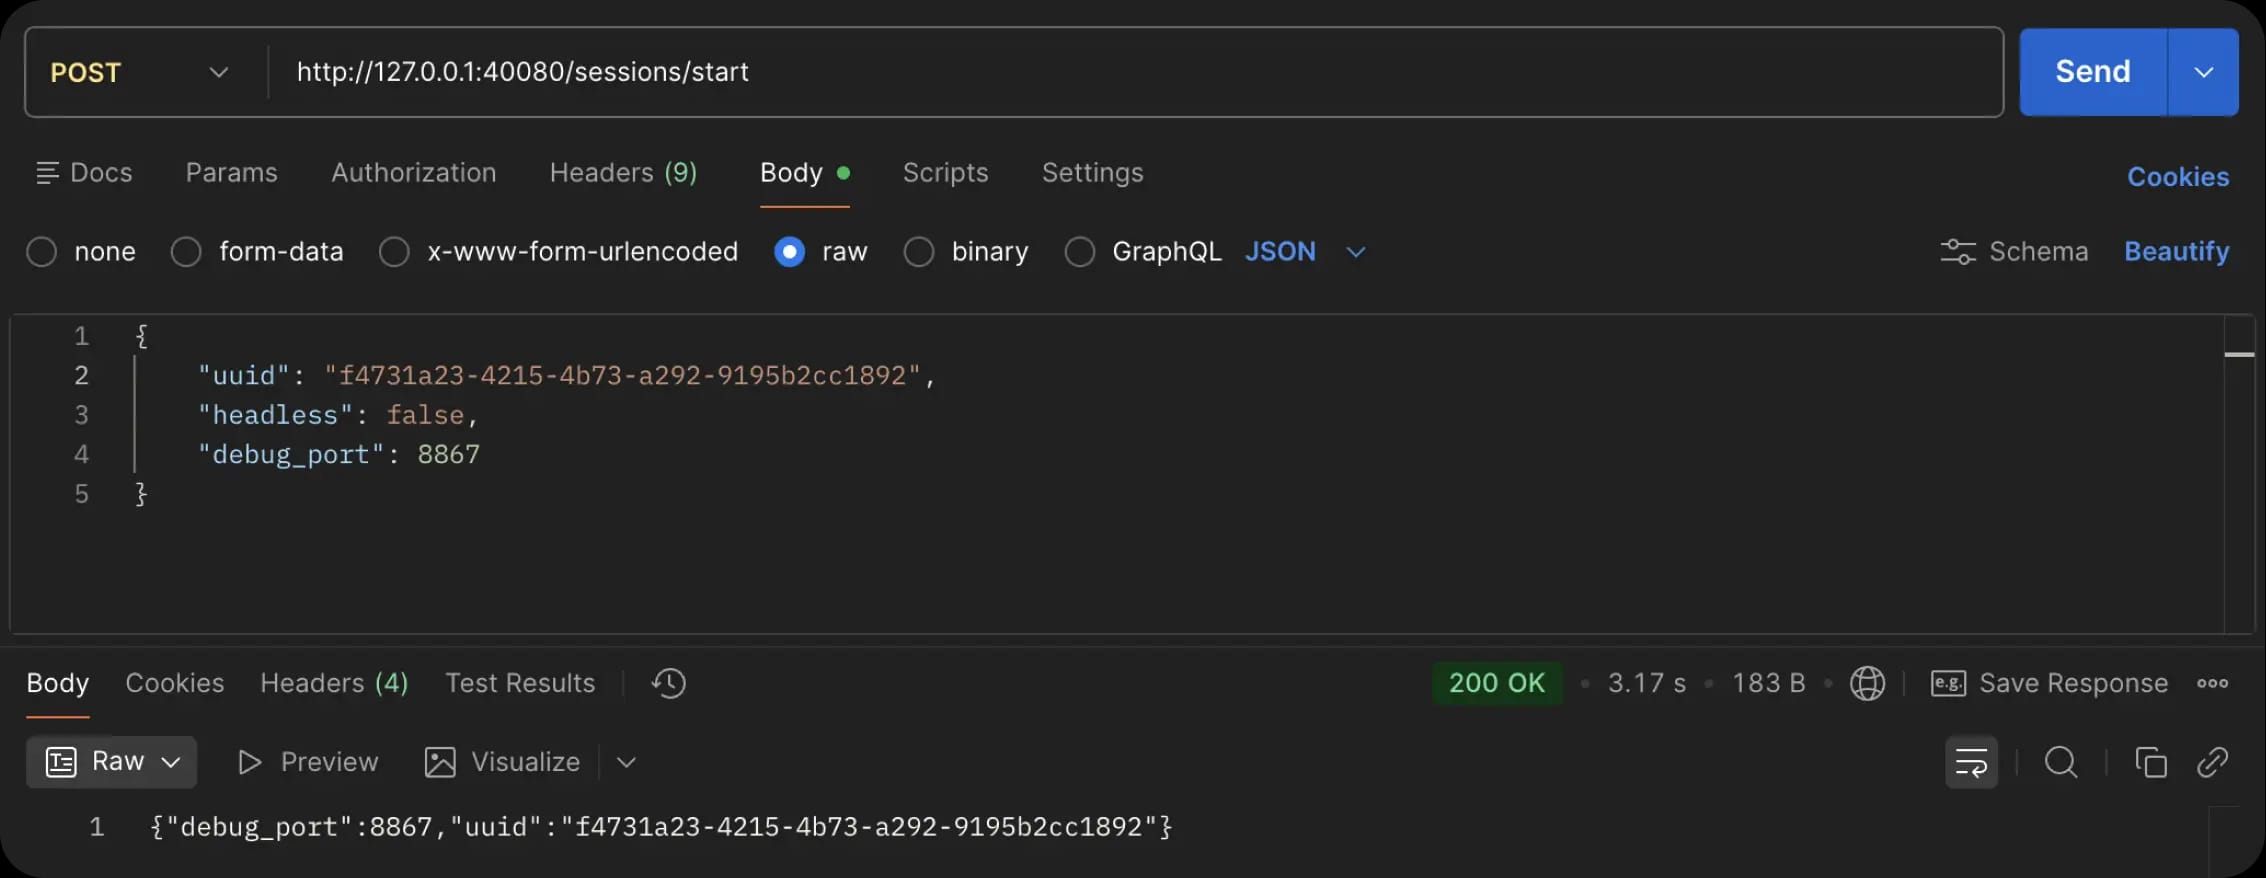
It should be noted that headless and debug_port are optional, and if they are not passed, the session will be launched in normal mode with automatic port assignment.
If everything is correct, the following structure will be returned in response
invisible text for space
{
 "debug_port": 12345,
 "uuid": "19bb5764-98a3-4ee1-bff8-5306e434493d"
}
invisible text for space
Important:
The local API only works when the Linken Sphere client is running.
Requests must be sent from the computer on which the Linken Sphere client is running.
The local API uses the port specified in the global settings of the program.
Step 2. Connecting to a running session
Selenium
To work with Selenium, you need to download and install ChromeWebDriver from the link:
For Mac Intel: chromedriver-mac-x64.zip
For Mac ARM (M-series): chromedriver-mac-arm64.zip
For Windows: chromedriver-win64.zip
Code examples for connecting Selenium to an already running browser are provided below.
invisible text for space
Selenium Python
# pip install selenium
from selenium import webdriver
from selenium.webdriver.chrome.service import Service

debug_port = 12345
# Specify the path to your chromedriver
s = Service(executable_path="/your/path/to/chromedriver.exe")
options = webdriver.ChromeOptions()
options.add_experimental_option("debuggerAddress", f"127.0.0.1:{debug_port}")
driver = webdriver.Chrome(service=s, options=options)

driver.get('https://ls.app/')
print(driver.title)
driver.quit()
invisible text for space
Selenium JS
// npm i selenium-webdriver
const { Builder } = require('selenium-webdriver');
const chrome = require('selenium-webdriver/chrome');

(async () => {
  const debugPort = 12345;

  // Specify the path to your chromedriver
  const service = new chrome.ServiceBuilder('/your/path/to/chromedriver.exe');

  const options = new chrome.Options().debuggerAddress(`127.0.0.1:${debugPort}`);

  const driver = await new Builder()
    .forBrowser('chrome')
    .setChromeOptions(options)
    .setChromeService(service)
    .build();

  try {
    await driver.get('https://ls.app/');
    const title = await driver.getTitle();
    console.log(title);
  } finally {
    await driver.quit();
  }
})();
Playwright
Examples of connecting to a running session using Playwright:
invisible text for space
Playwright Python
import asyncio
from playwright.async_api import async_playwright

debug_port = 12345
async def main():
 async with async_playwright() as p: {
  browser = await p.chromium.connect_over_cdp(endpoint_url=f"http://127.0.0.1:{debug_port}")
  context = browser.contexts[0]
  page = await context.new_page()
  await page.goto("https://ls.app/")
  print("Title:", await page.title())
  await browser.close()
 }
asyncio.run(main())
invisible text for space
Playwright JS
const { chromium } = require('playwright');
const debugPort = 12345;
(async () => {
  const browser = await chromium.connectOverCDP(`http://127.0.0.1:${'{'}debugPort{'}'}`);
  const context = browser.contexts()[0];
  const page = await context.newPage();
  await page.goto('https://ls.app/', { waitUntil: 'domcontentloaded' });
  console.log('Title:', await page.title());
  await browser.close();
})();
Pyppeteer/Puppeteer
Examples of connecting to a running session using Pyppeteer/Puppeteer:
invisible text for space
Pyppeteer Python
import asyncio
from pyppeteer import connect
debug_port = 12345
async def main():
 browser = await connect(browserURL=f'http://127.0.0.1:{debug_port}', defaultViewport=None)<br></br> page = await browser.newPage()<br></br> await page.goto(https://ls.app/')
 print('Title:', await page.title())
 await browser.disconnect()
asyncio.run(main())
invisible text for space
Puppeteer JS
const puppeteer = require('puppeteer');
const debug_port = 12345;
(async () => {
  const browser = await puppeteer.connect({ browserURL: `http://127.0.0.1:${'{'}debug_port{'}'}`, defaultViewport: null });
  const page = await browser.newPage();
  await page.goto('https://ls.app/');
  console.log('Title:', await page.title());
  await browser.disconnect();
})().catch(console.error);
Step 3. Stop the session via API
To stop the session via API, send a POST request to http://127.0.0.1:40080/sessions/stop with the “uuid” specified.
invisible text for space
{
 "uuid": "19bb5764-98a3-4ee1-bff8-5306e434493d"
}
invisible text for space
Detailed documentation on working with the API: documenter.getpostman.com/view/32398185/2s9YsRd9cC
If you have any questions, please contact support via chat in the program itself or using the bot in Telegram.
Previous page
Next page